Macros can help you to identify areas in your writing that need improving. You can also use macros for formatting and editing tasks. Some word processing programs, like Microsoft Word, can handle macros. You’ll find a list of writing macros you can try in the post Improve Your Writing With Macros, and the video below will show you how to add a macro to Word 2010:
Steps for Adding a Macro to Word
Go to the View tab, and click on Macros in the Window area.
Name your macro in the Macro name: box. Be sure your name has no spaces between words. For example, NeedlessWords.
Click Create. You will now be taken to Word’s VBA editor. This is where Word stores macros.
Copy the macro script and paste it into Word’s VBA. It will show you where to paste your macro (look for the section that has the same name as the macro you just named). Delete all the text that’s there (everything from Sub to End Sub) and paste your macro script into the VBA editor.
Close Word’s VBA editor by going to File, Close and Return to Microsoft Word. Your macro will be saved and you can now use it with any Word document.
For further instructions on how to use macros, see Macros for Editors, in which Paul Beverley offers detailed instructions for understanding and running macros in various versions of Word.
Macros can help you to identify areas in your writing that need improving. You can also use macros for formatting and editing tasks. In the post Improve Your Writing with Macros I listed some free writing macros you can try, followed by the next step, How to Add a Macro to Word. This post will explain how to run a macro:
Open a document in Word.
Go to the View tab, and click on Macros in the Window area. Select a macro from the list and click on Run. The macro will work its magic on your document.
Where to learn more
For further instructions on how to use macros, see Macros for Editors, in which Paul Beverley offers detailed instructions for understanding and running macros in various versions of Word.
Updated July 24, 2016: Sigil’s newest version has a different interface from the one you’ll see in this post. While Sigil is a great tool for the right price, I’ve begun to use Jutoh instead. Jutoh is better supported, and it allows me to create epubs and mobis.
It’s possible to build an ebook that’s straight fiction with a tool that many writers already have: Microsoft Word. But for more complex books with headings, endnotes, pictures, and other advanced style features, there’s a better way.
Sigil is a free, open-source epub editor that allows you to create an epub file that you can upload to most distributors (all but Amazon, actually). It’s surprisingly easy to use and if you’re at all interested in having more control over how your ebook looks, Sigil allows you to do a bit of tweaking under the hood.
Here’s how to get your book from Word into Sigil:
Quick Steps
Open your book in Word (I use Word 2010). Go to File, Save As, and save your file as Plain Text (.txt). Select “Other coding” and choose UTF-8 encoding (you’ll need to scroll down in the menu), Click OK.
Now that you’ve saved your document in a form that Sigil can read, copy and paste it from Word into the middle window in Sigil’s Book View.
You’ll find more information about how to begin with Sigil at the Beyond Paper blog.
I’m a firm believer in finding and using the best tool for the job. However, it’s not always possible to learn a handful of tools before you need to produce book. When you’re at the beginning of the self-publishing learning curve, it makes sense to choose a multipurpose tool that will do a decent job of everything, and then invest your time in learning how to use that tool well.
If I were to choose one tool that hits on everything required to publish an ebook, it’d be this one:
Microsoft Word.
So, why Word? It’s kind of like the self-publisher’s Swiss army knife. If you have time to learn only one tool, this tool will serve you well.
Note: I know that many writers use Scrivener, and for good reason. Still, Scrivener will not do all the things that Word can do. Definitely make it the next tool you learn, though.
Below, I’ve listed the steps in the publishing process that Word can handle. Don’t take my word for it (I couldn’t resist…), decide for yourself if Word is a one-stop shop for your publishing workflow.
Out of the box, Word will need a few tweaks to customize it for writing and self-publishing. Once you’re set up, writing in Word is straightforward.
Revising
If you know how to apply heading styles while you write, you’ll be able to make use of Word’s Navigation Pane, which behaves like Scrivener’s Binder. You’ll then be able to easily move sections of text around while revising.
Editing
Word shines at the editing stage of the publishing process. It has built-in tools I can’t imagine doing without. You can also use editing add-ins and macros with Word, making editing a more accurate and efficient process. To date, there isn’t a better tool for editing than Word.
Adding Images
It’s easy to insert images into your book with Word. Further, Word’s Smart Art and table design features can give an ordinary table visual zip.
On a lark, I designed a cover for one of my books using Word’s design tools and Derek Murphy’s excellent cover design tutorial to guide me. The cover won an honourable mention at the Ebook Cover Design Awards. The judges were surprised that the cover had been designed in Word, and I was surprised that Word’s design tools were easy enough to use, even for a non-designer.
Formatting
It is possible to format an ebook in Word and upload a Word file directly to Amazon or Smashwords. The key to the success of this method lies on your ability to create a “clean” Word file.
Word’s built-in tool, the Show/Hide feature, can help you see unnecessary formatting that can make your ebook misbehave. You can find and delete potential formatting glitches with Word’s Advanced Find and Replace feature. Add-in clean-up tools, such as CrossEyes and FileCleaner, can help you clean up a book file in a snap.
When it’s time to design your ebook, ebook design templates can help you create attractive ebooks. Print templates are available, too.
Beta Reader Reviews
You can create PDFs with Word 2010 and later. This is handy when you want to send an advance copy of your book to beta readers who like to mark-up a copy of your book on a tablet. Alternatively, you can send beta readers a copy of your book in docx format, so they can read it on a Kindle using their Send-to-Kindle email address.
Ebook Extras
Many authors are creating extra material, such as checklists, to accompany ebooks. This material is often posted on the author’s website. Word will allow you to create posters, PDFs, and interactive checklists to complement your ebook.
So, if you have time to learn only one tool, Word could be that tool. It’s the only tool I know of that accomplishes so much, so well.
Writers are encouraged to write a first draft without editing or formatting. And with good reason. Formatting and editing can often get in the way of getting your thoughts down. But at some point, you’ll want to format your writing so that it’s easier for your reader to navigate. That is, in fact, the point of formatting: you format for clarity. For reading ease.
What to Format
Sure, you can use the tool bar or the ribbon in your favourite Word processor to add
boldface
bulleted and numbered lists
headings
hyperlinks
images
italics
You can even use your word processor’s styles feature to format most of the items in the list above. But if your writing is headed for a digital environment, such as a blog or website, there’s a more reliable and efficient way to format: writing in markdown.
Markdown, Made Easy
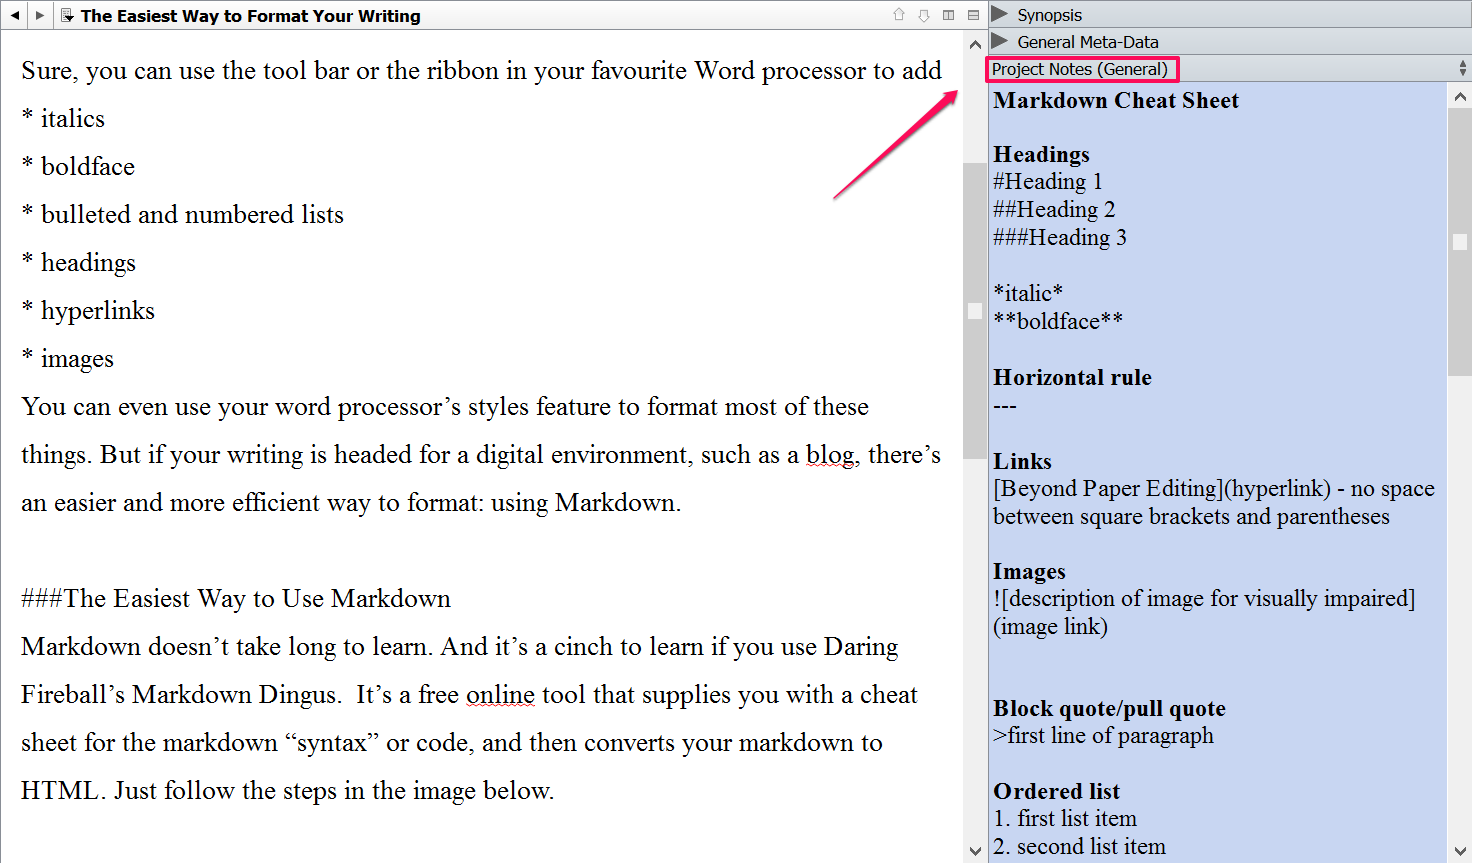
Markdown is a way in to creating HTML—the language of the Web and other digital environments and you don’t need to be techy to figure it out. It doesn’t take long to learn, especially if you use Daring Fireball’s Markdown Dingus. The Dingus is a free online tool that supplies you with a cheat sheet for the markdown “syntax,” in the margin, and it then converts your markdown to HTML. Just follow the steps in the image below.
Once you have your HTML text, you can pop it into your blog’s text editor. In WordPress, put it in the Text tab.
Markdown in Scrivener
You don’t have to write in the Dingus. I write in Scrivener instead (Scrivener is great for organizing blog posts). I’ve created my own markdown margin cheat sheet using the Project Notes area in Scrivener.
If you use Scrivener for Mac, you can export a file to the Multimarkdown (.html) format, which is similar to Markdown. No need to use the Fireball Dingus. This approach doesn’t work seamlessly for PC users, though.
Markdown Anywhere
Once you’re familiar with markdown, and you don’t have to rely on a cheat sheet, you can write in markdown in any word processor or text editor. I’d recommend trying the Hemingway app because it also doubles as an amazing proofreading tool.
Markdown is simple to learn, and saves you from having to fuss too much with formatting while you’re trying to get things down. Learning it will also prevent the wacky formatting that can occur in digital environments.
Writing in markdown can make your blogging workflow more efficient. It can also prevent formatting mishaps that show up after you hit Publish.
In a previous post, I explained why I use markdown, and how you can learn to use it in about 10 minutes. In this post, I’ll explain my writing and publishing workflow for WordPress, using markdown.
Note: You’ll use different steps for different blogging platforms. Stay tuned for a future post about markdown for Blogger.
Turn markdown into HTML, so that your post is now formatted for the web.
The Steps, Explained
1. Write your post in markdown. You can write your post in
Word,
Scrivener,
Google Docs, or
a plain text editor (like Notepad).
If you want to, you can write your post directly in the WordPress blog editor, but make sure you’re writing in the Text view and not the Visual view, where you might usually write. You’ll see why in a minute. The point is that markdown is flexible. You can write in markdown pretty much anywhere.
Text view in WordPress
I write blog posts in Scrivener because it’s another place to store them if my website self-destructs. I also like that Scrivener will allow me to store all of my blog posts in one Scrivener project folder, so that everything is in one place.
2. Copy your finished post and paste it into the Text view in WordPress. Save it. This is the same place where you’d paste text with HTML tags, too.
3.Download the free WordPress plug-in Markdown QuickTags*. Activate the plug-in and go back to your saved post. Markdown QuickTags has added some features to your WordPress editor.
4. Make sure you’re in the Text view of the editor and click on Render in the bottom right.
Render option in Markdown QuickTags
Your markdown text will be converted to HTML, the language of the web. Click on the View tab to see your formatted post.
And that’s it!
Markdown is training wheels for HTML. So, if you don’t know how to write in HTML, markdown is an easy way to tap into the benefits of HTML, and prevent formatting mishaps in your blog posts.
*I learned about the Markdown QuickTags from Joseph Michael in his Learn Scrivener Fast course.
Writing in markdown is an efficient way to write blog posts. In fact, it will forever change the way you blog.
So, what is markdown? It’s a coding language like HTML, only much, much simpler, and you don’t have to be tech savvy to learn it. It takes about 10 minutes to learn, if that.
Why I Use Markdown
Here’s why I use markdown:
Markdown is easy to learn.
I don’t have to fuss with the formatting features of a word processor when I write, which means I won’t introduce wonky formatting into my writing when it comes time to publish a post.
I can copy and paste my writing to and from Word, Google Docs, Scrivener, a text editor, Blogger, WordPress, etc. and the formatting codes will travel with it.
Markdown can convert to HTML, so if you’ve never been able to figure out how to write in HTML, you may not need to (see below).
It makes my blog writing and publishing process more efficient.
What does it look like?
Here’s what markdown looks like in action:
The text in the left pane is written in markdown. It kind of looks like plain text, right? That’s because it is. It’s pretty much what your writing would like if you only used your keyboard and didn’t click on any of the fancy formatting buttons in your word processor.
The text on the the right is what the published product will look like. Pretty, right? This particular markdown editor took the codes from the text on the left and converted it to formatted text. Do you see the codes? No? Read on…
Commonly Used Markdown Codes
Here are the markdown codes I use the most in my writing (I’ve left this list in plain text so that you can copy and paste it into Scrivener. if you like):
Headings
#Heading 1
##Heading 2
###Heading 3
*italic*
**boldface**
Horizontal rule
—
Links
[Tech Tools for Writers](hyperlink) – no space between square brackets and parentheses
Images

Block quote/pull quote
>first line of paragraph
Ordered list
1. first list item
2. second list item
3. thirdlist item
Unordered list
– list item
– list item
– list item
Can also use * instead of –
Soft break (poetry)
Line is followed by two spaces
First line [space, space]
Second line [space, space]
Other
em dash: Alt+ 0151
en dash: Alt + 0150
hyphen –
Go back to the image above. Do you see the markdown codes now? Allow me to highlight some of them for you:
The markdown syntax in this sample is highlighted in yellow.
If you don’t find what you’re looking for on my markdown list, check out this markdown cheat sheet. Print it and stick it next to your computer.
Or, if you write your blog posts in Scrivener like I do, you can copy and paste my list of markdown codes into the Project Notes menu in Scrivener’s Inspector, where it’ll always be available when you need it.
Markdown in Scrivener’s Project Notes
Try This
If you’d like to learn markdown, but you’re not convinced that it’s easy, try this guided, step-by-step interactive tutorial. I dare you to say it’s hard after trying this tutorial.
If you’d like to see markdown transform to polished text right before your eyes, try John Combe’s* free markdown editor. Use my markdown “cheat sheet” above and write something in the left pane. Watch your markdown text turn to beautifully formatted text.
In my next post, I’ll explain how I use markdown for blogging on WordPress, and I’ll share my writing and publishing process with you.
*I learned about the John Combe markdown editor from Joseph Michael in his Learn Scrivener Fast course.
Most writers are familiar with the adage, show, don’t tell. But sometimes it’s tricky to determine when those telling instances have crept into your writing.
Editor Janice Hardy of Fiction University explains how telling happens and offers advice for how to turn telling into showing. She and Valerie Comer of To Write a Story suggest lists of words you should avoid to prevent instances of telling.
I’ve inserted some of Valerie Comer’s and Janice Hardy’s telling words into the macro script below so you can identify them in your own writing. I’ve also included some words of my own.
TellingWords in action; writing sample by Carla Douglas, used with permission
Copy the TellingWords* macro, below, from Sub to End Sub and paste it into Word’s Visual Basic Application (VBA). When you run the macro, it will hunt down and highlight those telling words so you can tell them, I mean, show them who’s boss.
Sub TellingWords()
‘ Highlights telling words
‘
‘
‘ Written by Roger Mortis, revised by Subcortical, adapted by Jami Gold and tweaked by C.K. MacLeod; word list by Valerie Comer and Janice Hardy
‘
Dim range As range
Dim i As Long
Dim TargetList
TargetList = Array(“was”, “were”, “when”, “as”, “the sound of”, “could see”, “saw”, “notice”, “noticed”, “noticing”, “consider”, “considered”, “considering”, “smell”, “smelled”, “heard”, “felt”, “tasted”, “knew”, “realize”, “realized”, “realizing”, “think”, “thought”, “thinking”, “believe”, “believed”, “believing”, “wonder”, “wondered”, “wondering”, “recognize”, “recognized”, “recognizing”, “hope”, “hoped”, “hoping”, “supposed”, “pray”, “prayed”, “praying”, “angrily”)
For i = 0 To UBound(TargetList)
Set range = ActiveDocument.range
With range.Find
.Text = TargetList(i)
.Format = True
.MatchCase = False
.MatchWholeWord = True
.MatchWildcards = False
.MatchSoundsLike = False
.MatchAllWordForms = False
Do While .Execute(Forward:=True) = True
range.HighlightColorIndex = wdPink
Loop
End With
Next
End Sub
Note: You need to use judgement with the results of any macro. This macro will highlight the telling words, but only you can decide if it’s an instance of telling.
To figure out what to do with the words the macro highlights, refer to Janice Hardy’s excellent show vs. tell posts. Also, this macro is a work in progress. Are there words I should include? Omit? Let me know in the comments section below.
*Karen Woodward calls this macro the AddWords macro because you can add any list of words that you want the macro to find. The first version of this macro was written by Roger Mortis, revised by Subcortical, appropriated for writing by Karen Woodward, tweaked byJami Gold, and further tweaked by me, making it a true community effort.
One of the easiest ways to format an ebook is to begin with the tool you probably already have—Microsoft Word.
I know, I know. HTML & CSS enthusiasts and InDesign evangelists everywhere have just engaged in a collective shudder.
But hear me out. Not all self-pubs have access to expensive design software or the time or interest for the required learning curve. Many of them do have access to Microsoft Word, though. Why not begin where they’re at? That’s what Joel Friedlander and Aaron Shepard have done. You’re welcome to take it up with them. wink
So, having gotten that out of the way, if your manuscript is in Microsoft Word, there are several things you can do to ensure a smoother transition from Word to ebook. Your first step is to clean up your book in Word. Here’s what you need to do:
Quick-Steps
Remove headers, footers, and page numbers.
Remove underlining in headings.
Remove footnotes.
Remove two spaces after end punctuation.
Remove manual tabs and spaces.
Remove text boxes.
Remove tables formatted in Word. Reinsert them as images instead.
Avoid using the list buttons on the ribbon to create bulleted and numbered lists.
 By C. K. MacLeod