Macros can help you to identify areas in your writing that need improving. You can also use macros for formatting and editing tasks. Some word processing programs, like Microsoft Word, can handle macros. You’ll find a list of writing macros you can try in the post Improve Your Writing With Macros, and the video below will show you how to add a macro to Word 2010:
Steps for Adding a Macro to Word
Go to the View tab, and click on Macros in the Window area.
Name your macro in the Macro name: box. Be sure your name has no spaces between words. For example, NeedlessWords.
Click Create. You will now be taken to Word’s VBA editor. This is where Word stores macros.
Copy the macro script and paste it into Word’s VBA. It will show you where to paste your macro (look for the section that has the same name as the macro you just named). Delete all the text that’s there (everything from Sub to End Sub) and paste your macro script into the VBA editor.
Close Word’s VBA editor by going to File, Close and Return to Microsoft Word. Your macro will be saved and you can now use it with any Word document.
For further instructions on how to use macros, see Macros for Editors, in which Paul Beverley offers detailed instructions for understanding and running macros in various versions of Word.
Macros can help you to identify areas in your writing that need improving. You can also use macros for formatting and editing tasks. In the post Improve Your Writing with Macros I listed some free writing macros you can try, followed by the next step, How to Add a Macro to Word. This post will explain how to run a macro:
Open a document in Word.
Go to the View tab, and click on Macros in the Window area. Select a macro from the list and click on Run. The macro will work its magic on your document.
Where to learn more
For further instructions on how to use macros, see Macros for Editors, in which Paul Beverley offers detailed instructions for understanding and running macros in various versions of Word.
Originally post at the Book Designer on August 26, 2015.
Do you proofread your book after it’s been laid out for print or formatted for e-reading? You should. Proofreading is the last stage of the editorial process and its goal is to catch any errors that the writer, editor, and book designer or formatter have missed.
Why Your Book Needs Proofreading
By this point in the publishing process, you might be thinking, “Wait a minute. What errors? There shouldn’t be any errors. I hired a copyeditor to take care of those!” While a copyeditor will catch most errors, they won’t catch them all. Most editors agree that 95 percent is the industry standard. What’s more, it’s not possible for a copyeditor to correct errors that haven’t yet been made.
Every time someone opens your book file—you, your copyeditor, the formatter or book designer, or your keyboard-curious cat—an error can potentially be introduced!
Have you ever inadvertently leaned on your space bar while reaching for your latte and inserted extra spaces between words? Copied and pasted a section of text and discovered you missed copying the last sentence? You know what we’re talking about, then. Because these things can happen to a book’s designers and formatters, and because they will receive your book after a copyeditor works his or her magic, any errors that occur in the design process will never be seen by your copyeditor.
All of this points to the importance of having a last look at your book, in its final environment, after it has been designed for print or formatted for e-reading devices. You need to be your book’s first reader.
Print or Ebook?
There are lots of ways to proofread a book. How you proofread it will depend on the publishing format you choose. If your book is headed for print, you’ll need to proofread the PDF that will be sent to the printer or print-on-demand service you’ve chosen. If your book will be an ebook, it makes sense to proofread it on an e-reader.
How to Proofread a Print Book
In the past, professional proofreaders proofread books on paper. Now, most proofreaders will proofread a book with software that allows them to mark errors on a PDF. Self-publishing authors can do the same, using these two free software options:
PDF XChange Editor
Adobe Reader XI
Both pieces of software have drawing tools and text tools that will allow you to circle errors, insert missing words, and make notes in the margins without disrupting the book designer’s layout. You can even mark errors with proofreading stamps, which is entirely too much fun.
Wiley Publishing’s proofreading stamps in PDF XChange Editor
It’s also possible to proofread your book on a tablet with a stylus using iAnnotate. To learn more about proofreading tools for print books, read 8 Proofreading Tools for Beta Readers.
How to Proofread an Ebook
Proofreading an ebook requires a different strategy. You can’t mark up the text as you would in a print book. The text is not static, but flowable, so you need another method for keeping track of errors.
If your ebook has been formatted as an epub (for Apple, Nook, and Kobo), it’s best to proofread it using Adobe Digital Editions 3.0 (free). The ebook formatting and design company 52 Novels has created a proofreading procedure that works well for epubs.
If your ebook is in mobi format (Amazon), you have a couple of options. You can proofread your ebook using
After you’ve identified errors in your print book or ebook, you’ll need to have your book designer or formatter make corrections in your formatted or designed file.
Managing the Proofreading Process
There’s a lot to keep in mind while proofreading a book. The following proofreading management tips can help you organize the details.
1. Decide what you’ll look for.
While proofreading, you’ll need to look for language errors and formatting errors. It helps to have a checklist to guide you. These two lists will give you a good idea of what look for:
If you’re proofreading a print book, standard proofreading procedure involves checking that words at the end of lines are breaking in the right places.There are many do’s and don’ts surrounding word breaks—far too many to discuss here. The gist is that you want words to break in a way that won’t distract the reader or interrupt the flow of reading. Looking up words in a dictionary will help you to break them correctly.
Having said that, controlling for word breaks in ebooks is time-consuming, so many formatters and traditional publishers don’t do it. Do readers notice? We’ll leave it to you to decide! If you’d like to know more about controlling word breaks and similar ebook formatting decisions you’ll need to make, see The Ebook Style Guide: Creating Ebooks That Work for Readers.
2. Develop a plan.
There are many steps to proofreading a document. Decide the order in which you’ll do things. For example, we tend to run a book through a consistency checker like PerfectIt Pro* before we begin an initial read-through so we can preview any inconsistencies in the book. We then do a focused, beginning-to-end, word-by-word read-through, marking up errors as we go. We might do a separate pass, using the search function to look for recurring errors, and then we’ll do a “page-through” to ensure that we’ve addressed widows and orphans and word breaks (print books only). We then run PerfectIt Pro again, to catch any inconsistencies we may have missed or introduced.
Every markup that we make or correction that we suggest is informed by the copyeditor’s style sheet, a list of decisions the copyeditor made to make the book as a consistent as possible. If your book has been copyedited, ask your copyeditor for the style sheet so you can use it to guide you while proofreading. By the way, it’s never a good idea to proofread a book before it has been copyedited, so always make sure your book is copyedited before it’s proofread.
Every proofreader will handle the proofreading process differently. Your process will be different if you’re proofreading a print book or an ebook. Keep track of your process with each book, so you can find ways to make proofreading more efficient.
*To improve accuracy and efficiency, some proofreaders will strip the text from the designer’s PDF and paste the text into Word. This allows them to use the Word add-in PerfectIt Pro to efficiently check for inconsistencies. Any inconsistencies are marked up on the designer’s PDF.
3. Attend to details.
It’s easy to allow details to slip past you as your read your book. Try not to get sucked into your story! Proofreading is a different kind of reading. You’ll need to read every letter, every punctuation mark, and every space. For example, proofreaders will slow down enough to notice when a period should be italicized, or set in roman type! Proofreaders learn to search for inconsistencies, and to see the smallest details when they read.
4. Read “aloud.”
In her handout Proofreading Secrets, proofreader Elizabeth Macfie explains that while reading, your brain will behave like the “autocorrect” function in a word processing program, meaning that it will tell you what should be on the page, instead of what is actually there. To bypass this tendency, read aloud or use a text-to-speech tool that can read the text aloud to you. (If you’re using Adobe Reader XI for PC, it has a text-speech function built in). Hearing the words will help to you to hear the errors that your eyes are not seeing.
Tip: If you “whisper read” you’ll save your vocal cords from getting too tired.
5. Read slowly.
Read at a steady “thinking” pace—not too slow and not too fast. Reading aloud or using a text-to-speech tool can help you to go more slowly than you normally would if you were reading silently. Some text-to-speech tools will even allow you to adjust your reading speed.
Set a timer and keep track of your reading rate (number of pages per hour). You’ll be able to use that information to decide if this is how you want to spend your time for future book projects, or if hiring a proofreader is a more palatable option. Keep in mind that some kinds of books, such as dense and technical nonfiction books, will take you longer to proofread than others.
6. Take frequent breaks.
Proofreading requires intense focus, and it can be difficult to sustain focus for long periods of time. Drink lots of water while proofreading to force yourself to take frequent breaks! Set goals to stay motivated. Decide how many pages or chapters you’ll proof before you’ll get up for a stretch.
7. Be kind to yourself.
If you’re proofreading on a tablet or a Kindle, find a comfortable armchair to sit in. It’s nice to take a break from an office chair. Save your eyes from strain by positioning yourself near a window, so you have lots of natural light.
Summing it Up
There are many things to consider while proofreading. A plan, a few tricks from the pros, a handful of tools, and a little self-care will help to make the process easier and more enjoyable. If, in the end, you decide that DIY proofreading is not for you, that’s okay. I know at least two proofreaders who’d be happy to help you out!
Proofreading tools are an easy way to help you see and fix potential problem areas in your writing. For years I’ve been using the Hemingway Editor created by Adam and Ben Long. It’s a standalone program that costs $20 US, and you can download it to a PC or a Mac computer. You can also try the free online version. It’s most helpful if your aim is to make your writing clear.
How it Works
The Hemingway Editor highlights common problems that can get in the way of clear writing:
Complex words or phrases
Extra-long sentences
Long sentences
Too many adverbs
Too many instances of passive voice
It colour codes each potential error type, so you can address them one at a time. You can see an explanation of each error type here.
The app won’t tell you
how to fix long sentences (shorten them),
what to do with adverbs (delete most of them), or
how to handle too many instances of passive voice (rewrite the sentence in the active voice—sometimes), but…
…it will suggest simple words for complex ones.
The Hemingway Editor (and other revision tools like it), will give you something to correct in your first draft, just minutes after you’ve written it. This makes it a terrific tool for on-demand writing with tight deadlines.
Quick Steps
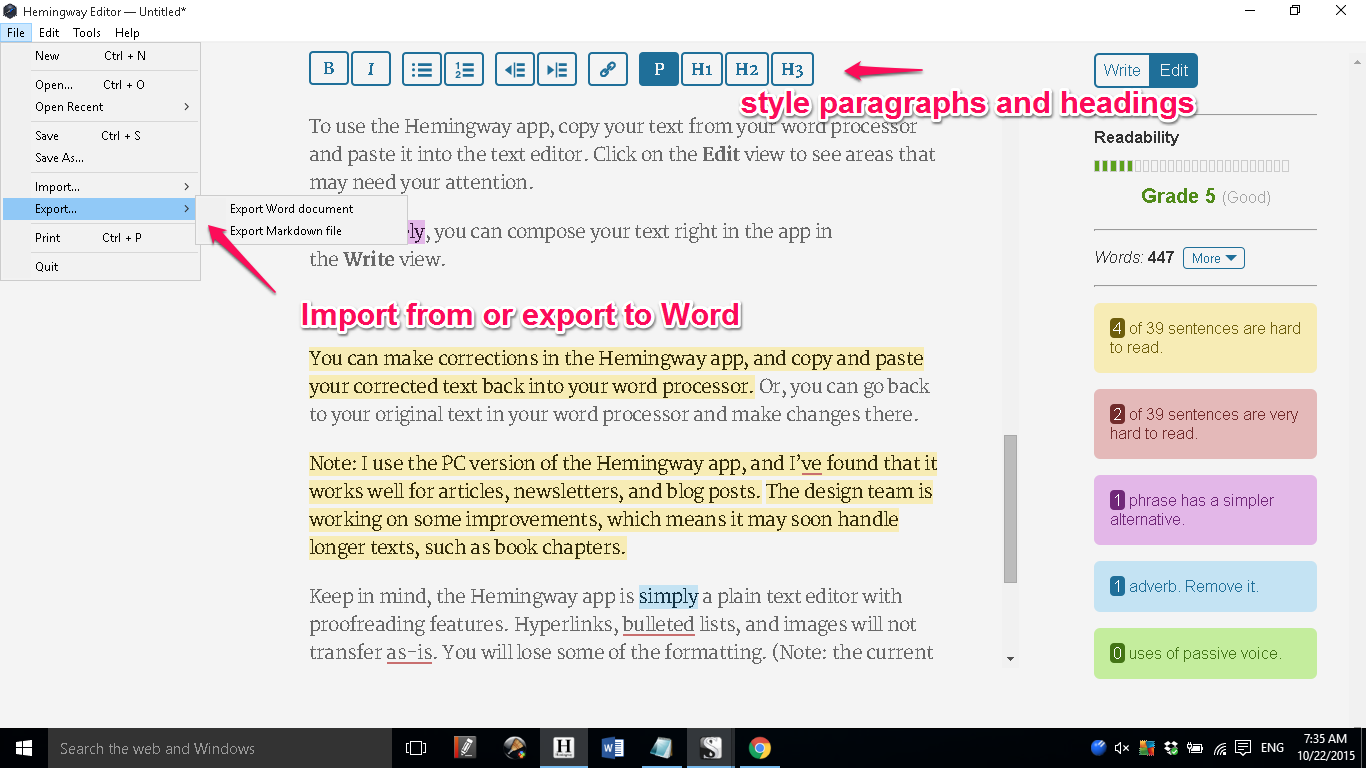
To use the Hemingway Editor, copy your text from your word processor and paste it into the text editor. Click on the Edit view to see areas that may need your attention.
Alternatively, you can write right in the app, in the Write view.
You can make corrections in the Hemingway Editor, and copy and paste your corrected text back into your word processor. Or, you can go back to your original text in your word processor and make changes there.
The newest version of Hemingway (2.0) will now allow you to add headings and paragraph styles, and if you decide to save the file as a Word doc, the heading and paragraph styles will show up in Word. You can also export your file in markdown.
Note: I use the PC version of the Hemingway Editor, and I’ve found that it works well for short texts, such as articles, newsletters, and blog posts.
Keep in mind, the Hemingway Editor is a simple text editor with proofreading features. Hyperlinks, bulleted lists, and images will not transfer as-is. You will lose some of the formatting.
The Hemingway Editor is an excellent tool, especially for the price (you can’t beat the free version!).
If you don’t want to use a separate program to revise your writing, and you already use Microsoft Word for editing and proofreading, try some of the revision macros on this blog. They’re free, and so is the 20-Minute macro course that will teach you how to use them.
Many self-publishing authors use beta readers to get feedback on a book before publication. You don’t have to work on paper; you can use a computer or a tablet to “mark up” or make notes on an author’s manuscript.
Below is a list of tools for beta readers. An author may send you a manuscript in a variety of formats, so I’ve included options for several file formats.
File Formats
Sometimes it will make sense to convert the author’s file to another format. Many of the proofreading tools below will read PDFs. You can save an .rtf, .doc, or .docx file as a PDF with Microsoft Word or WPS Writer (free). If you have a stylus for your tablet, you may be able to mark up text like you would on paper.
This table will tell you which tool will read which file format. I summarize the features of the tools below.
Tablet Apps
Adobe Reader (free)
Reads PDF files
Available for Android and iOS
In-text highlights, strikethroughs, and comments
Drawing tools for mark-up
Works well with a stylus
Search function, so you can search all instances of an error
Allows you to load PDF stamps into the software (see below), so you can mark a variety of proofreading errors with symbols instead of with comments
In-text highlights, strikethroughs and comments
Robust search function
Read-aloud feature so you can listen for mistakes that your eyes might miss
PDF XChange Editor (free)
Reads PDFs
Used by professional proofreaders
Drawing tools for mark-up
Allows you to load PDF stamps into the software
In-text highlights, strikethroughs and comments
Robust search function
Adobe Digital Editions
Reads epubs
Use ADE if the book has already been professionally formatted for e-readers
It’s not possible to mark up in ADE, but you can copy sections of text into a word processor and mark up the changes there—procedure explained by Rob at 52 Novels
Kindle E-ink Readers and Apps
Reads mobi files
Use this method if the book has already been professionally formatted for Kindle e-readers and apps
Computer software tends to have more robust search functions than tablet apps, but it can take a while to figure out how to use the drawing tools to mark up the text with a mouse.
Proofreading stamps are a shorthand for proofreading errors, and tend to make the proofreading process faster. Use them if the author knows what they mean (or provide the author with a glossary of symbols, if you like).
Note: As far as I know, stamps tend to only work in the desktop versions of proofreading software.
Wiley Publishing stamps in PDF XChange Editor
If you want to imitate the pros, you can import* proofreading stamps into your proofreading software or design your own. Louise Harnby of the Proofreading Parlour offers a collection of British proofreading stamps for free, and you can find American proofreading stamps on the Wiley Publishing website.
Do you have a favourite proofreading tool not listed here? Tell us about it in the comments below.
*To learn how to import proofreading stamps into Adobe Reader XI or design your own, see this video by Adrienne Montgomerie.
PerfectIt Pro, a popular copyediting and proofreading tool, has been updated to include new and improved features. Many excellent features—such as the style sheet builder—remain, but new features add even more value to this proofreading favourite.
In this post, I describe a few features that I think will be helpful for editors and proofreaders — and authors interested in learning how to at least partially automate some editing tasks.
A New Look
PerfectIt Pro 3 (P3) is designed to work with Microsoft Word — the tool of choice for professional editors and proofreaders. When you install P3, you’ll notice it has its own tab in Microsoft Word:
That’s nice because many of P3’s features are no longer buried — they’re laid out in Word’s ribbon for the user to see. P3 is wide and deep, and the new tab goes a long way toward encouraging the exploration of features you might otherwise not notice.
Consistency Tests
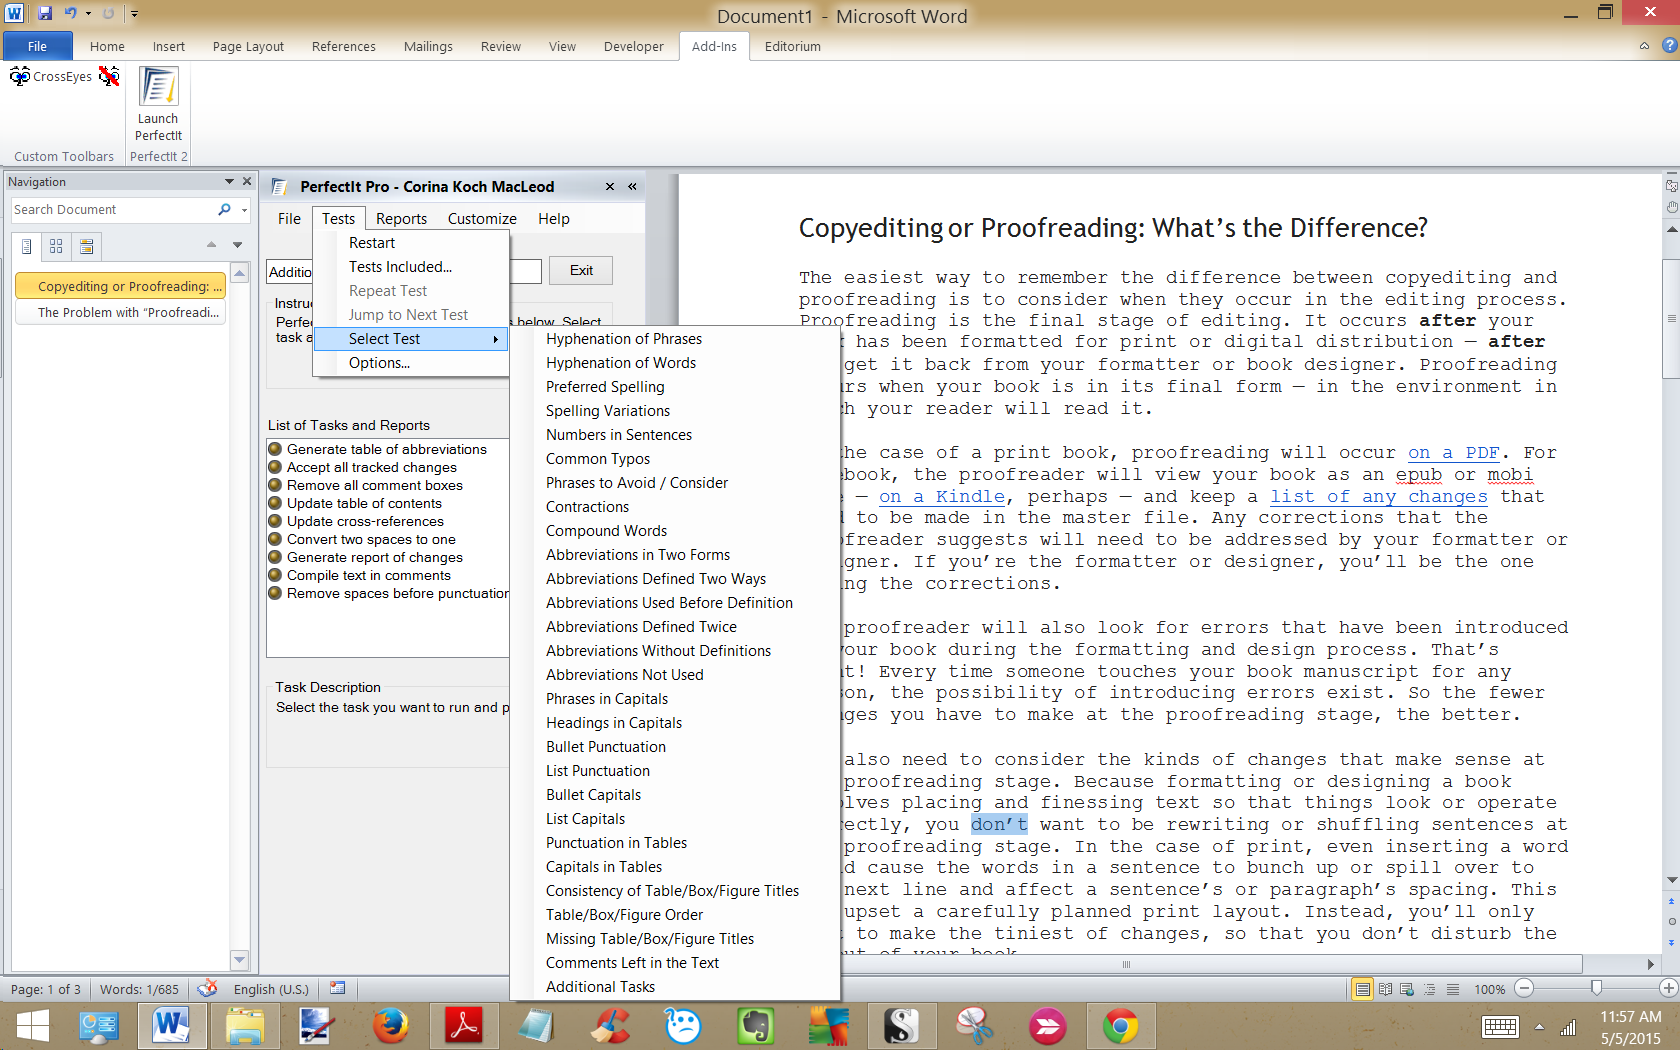
P3 has added new “tests” that you can run on a document in order to check for inconsistencies. Below is a screen capture of P3’s tests. The new tests are circled in pink.
Of the new tests available in P3, the following tests can be especially useful to writers, editors, and proofreaders who want to take some of the grunt work out of self-editing and proofreading:
Brackets and Quotations Left Open Test
It’s not uncommon for writers to forget to close quotations or brackets. P3 will find open quotes and brackets and create a list of them so you can systematically close them up. I don’t really need to say how much time that can save, do I?
Italics Test
There are rules about how italics are used. For example, some style guides state that you italicize less common foreign words and phrases. In the Italics test, P3 will identify certain foreign words and phrases and allow you to decide how and when a word will be italicized:
Serial Comma Test
Do you use the serial comma, or Oxford comma? If you do, an editor will check that you’re using it consistently throughout your book. Tedious? Unbelievably. Time consuming? You bet. Nearly impossible to catch them all manually? I think so. P3 will systematically identify places in your writing where you may need to insert the serial comma.
Note: The serial comma feature in P3 is not activated out of the box. You need to turn it on. Here’s how:
In the PerfectIt 3 tab on the ribbon, click on the Manage Styles icon.
Click on the Edit Style Sheet button to bring up the Style Sheet Editor.
Click on the Settings tab.
In the pull-down menu, select Serial (Oxford Comma). In the PerfectIt should check field, select Serial (Oxford) Comma. Then, in the It should make sure documents use field, select the Use Oxford comma option and click Apply. You can now check your document for missing serial commas.
Greater Customization
P3 has a new feature that allows users to decide what combination of tests they want to run on a document. You may not always want to run all the tests available in P3, so you now have the option of unchecking the boxes next to the tests you don’t want to run.
There’s much more to say about P3’s newest features, and I hope to be writing about them as I continue to investigate this tool. For now, exploring the features described in this post is a great way to acquaint yourself with the newest version of PerfectIt.
For more information about the latest version of PerfectIt, visit Intelligent Editing.
Are you a PerfectIt 3 user? What are your favourite features?
Disclaimer: I have been a paid user of PerfectIt since version 1. Intelligent Editing has kindly supplied me with a review copy of PerfectIt 3. I continue to be a fan.
Professional proofreaders use computer tools to check for proofreading errors. While proofreading, checking for inconsistencies is important because inconsistencies can distract readers.
Not sure what inconsistencies to check for? Don’t worry. PerfectIt Pro, a proofreading tool favoured by the pros, walks you through the process, and in some ways, acts like a proofreading checklist. It identifies inconsistencies in your writing so you can fix them. I’ve written about Consistency Checker, the lite version of PerfectIt Pro, so you can see what kinds of things these tools check for.
Note: PerfectIt Pro runs 27 tests on a document. Consistency Checker is a sample of what PerfectIt Pro can do.
The Fix Feature
Unlike Consistency checker, PerfectIt Pro will run as a plug-in in any PC version of Word (sorry, Mac users, PerfectIt isn’t yet available for Macs). And, besides checking for inconsistencies, PerfectIt Pro will give you options for fixing them.
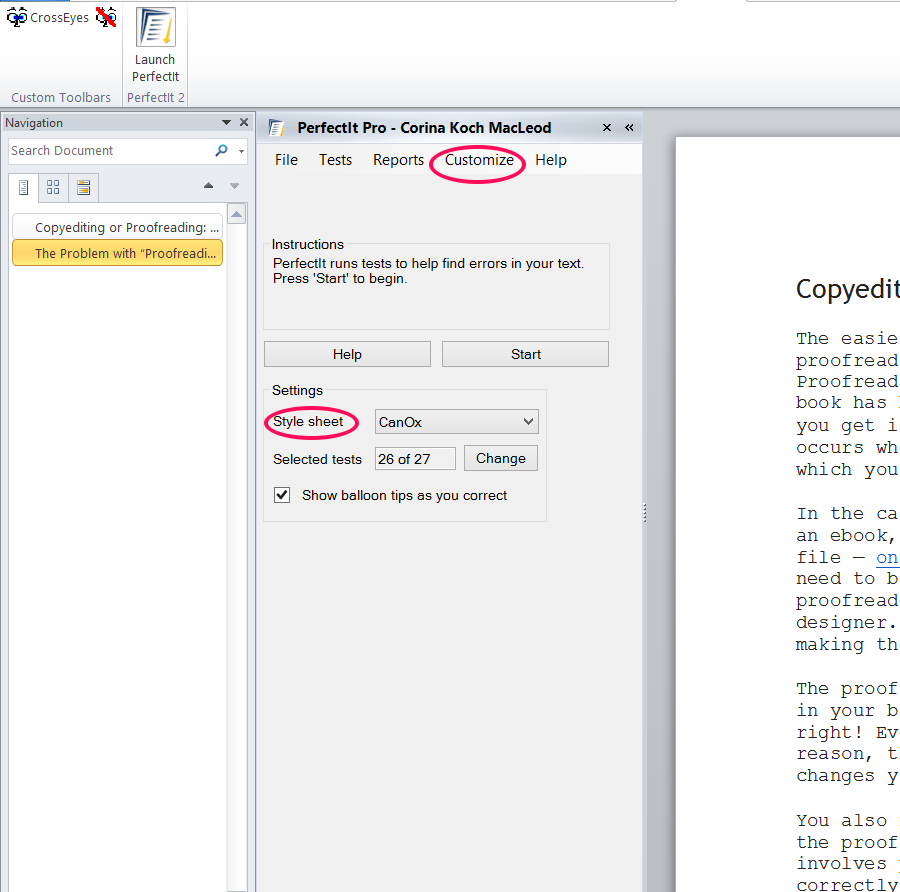
Style Sheets
PerfectIt Pro also has a style sheet option, that can greatly reduce the amount of time it takes to check that you’ve spelled words consistently. For example, if you’re a Canadian (like I am) and you want to be sure that you’ve spelled words as recommended by the Canadian Oxford Dictionary, you can add the Canadian Oxford style sheet to PerfectIt Pro and it will flag any words that need their spellings adjusted. There are style sheets for UK and US spellings, too.
Loading Style Sheets
Here’s how to load style sheets into PerfectIt Pro:
Download a style sheet from the Intelligent Editing site.
Open PerfectIt Pro in Word. You’ll find it in the Add-in Tab.
Click on Customized, Advanced, Import.
To run the style sheet, choose the style sheet you want to use in the Settings area.
Build Your Own Style Sheets
You can build your own style sheets, too. In PerfectIt Pro, click on Customized, Advanced, New and begin adding words to the style sheet template. Include in your style sheet the spellings you want to use, and PerfectIt Pro will comb through your book file and alert you to the ones that don’t match. This is particularly useful if you have a 300-page book filled with names and places with unusual or hard-to- remember spellings.
Many proofreaders will say that because of the time it saves, PerfectIt Pro often pays for itself the first time you use it. For writers, using PerfectIt can reduce the cost of professional proofreading, if you check your manuscript before sending it to a proofreader.
You can try PerfectIt Pro for 30 days and decide for yourself!
Are you a beta reader or an editor? You don’t have to review or proofread a book on your computer. You can proofread it on a Kindle, or any device with the Kindle app loaded on it.
Here’s how:
1. Sign up for an Amazon account if you don’t already have one.
2. Add your reading device to your Amazon account, if it hasn’t been added already. Your device is automatically added to your Amazon account when you download the Kindle app onto it.
Once added to your Amazon account, your device will have an email address with an @kindle.com extension associated with it. To find this email address for your device, go to Your Account, Manage Your Content and Devices, and click on the Your Devices tab.
3. Go to your personal email account — your gmail account, for example. Email the book file as an attachment, from your personal email account to your @kindle.com email address. You can email a variety of file types, including .docx files or mobi files (one of Amazon’s formats).
Note: You need to email your book from the email account that’s associated with your Amazon account. If you use another email account, it won’t work. If you have more than one reading device linked to your Amazon account, make sure you’re emailing the document to the right device.
4. Turn on wifi and sync your Kindle or your device with the Kindle app on it. The book should arrive on your reading device within a few minutes.
5. Use the Notes and Highlights feature on your Kindle, or in your Kindle app, to proofread the book. If you’re a beta reader, share the Notes and Highlights (your feedback) with the author.
Proofreading on a Kindle is easy. Further, proofreading a book in a new environment can help you to see errors that you’d otherwise miss.
Have you discovered the Google Docs library of Add-ons? They work like plug-ins and they can perform a variety of useful tasks.
Consistency Checker,by PerfectIt, is a lite version of one of my favourite proofreading tools. It will scan your document for:
abbreviations in two forms (US vs. U.S.)
common typos (teh vs. the)
contractions (contractions aren’t used in all kinds of writing)
hyphenation of words (in-line vs. in line)
numbers in sentences (spelled out or numerals?)
spelling variations (colour or color)
These are some of the items a copyeditor or proofreader will typically check in a manuscript.
Where to Get Consistency Checker
If you have a gmail account, you can get Consistency Checker through Google Docs:
Click on the Add-ons tab in Google Docs, click on Get add-ons and search for the Consistency Checker by PerfectIt. Download the add-on.
Open the Consistency Checker by once again clicking on the Add-ons tab in Google Docs. The Consistency Checker should now be listed.
Click Open and then click Scan.
Interpreting Consistency Checker’s results takes a bit of practice and may require you to look up a few things in a style guide, but once you have the hang of it, you can use this proofreading tool before you share your writing with the world.
For more information about Consistency Checker and other useful editing tools, see this post at the Beyond Paper blog.
Many beta readers and editors like to proofread on a Kindle or in a Kindle app. This process involves highlighting passages and taking notes on your Kindle. When you’ve finished your proofread, you’ll need a way to get those notes to the author. But how?
Below are three options for retrieving your notes and highlights so you can share them with the author.
An Important Distinction
Amazon handles notes and highlights for purchased books differently than those for unpublished books, or personal documents. Notes and highlights for purchased books are stored in your Amazon account. Notes and highlights for unpublished books and documents are stored in the My Clippings file on your Kindle device. Below are the steps you need to follow to retrieve your notes and highlights for each kind of book.
For Purchased Books
Go to your Amazon account to retrieve your notes and highlights. Sign in with your account username and password and click on Your Highlights. All the books you’ve made notes on are stored here.
If you don’t see the notes in your Amazon account, check your Kindle device. You’ll need to turn on the Annotations Backup feature that allows you to back up notes and highlights to your Amazon account.
a) Copy the notes and highlights you want to share, and paste them into a .txt file or a .docx file. Email this file to the author.
or…
b) If you use Evernote, and have the Evernote Clipper installed on your browser, you can it to send notes and highlights to Evernote.
Kindle notes and highlights on your Amazon page
From Evernote, you can share the notes and highlights with the author by clicking on the Share icon.
Kindle notes and highlights in Evernote
The notes and highlights will then show up in the author’s Evernote account.
I learned this trick from Audri and Jim Lanford’s article at Paperitis. If you’re an Evernote user you’ll appreciate the elegance of this approach.
For Personal Books and Documents
Your highlights and notes from personal documents are not stored in your Amazon account. They are stored in the Clippings file on your Kindle. Here’s how you access those notes so you can share them with the author.
Plug your Kindle device into your computer.
Find your Kindle device on your computer’s hard drive. Click on it.
Click on the Documents folder (it might be spelled documents).
Click on the My Clippings.txt file. The notes you’ve made for unpublished books and personal documents are stored in this file, so you’ll need to search for the title of the book you’re looking for (CTRL + F).
Copy and paste your notes into a .docx file or a .txt file and email them to the author:
Notes and highlights copied to Notepad (.txt file)
If you’d like a place to store these notes, you can copy them into Evernote and then share that note with the author as described above.
Clippings.io Method
If you don’t mind shelling out $2 per month, try the Clippings.io plug-in for Chrome. It’ll push your clippings to a Clippings.io account (free to set up) and you can manage your clippings from a central location.
You now have three ways to retrieve and share Kindle notes and highlights!
A special thanks to Len Edgerly at Kindle Chronicles for telling me about the My Clippings file and the Clippings.io plug-in.
 By C. K. MacLeod